2012年5月26日 星期六

[osx] 擠出可用記憶體

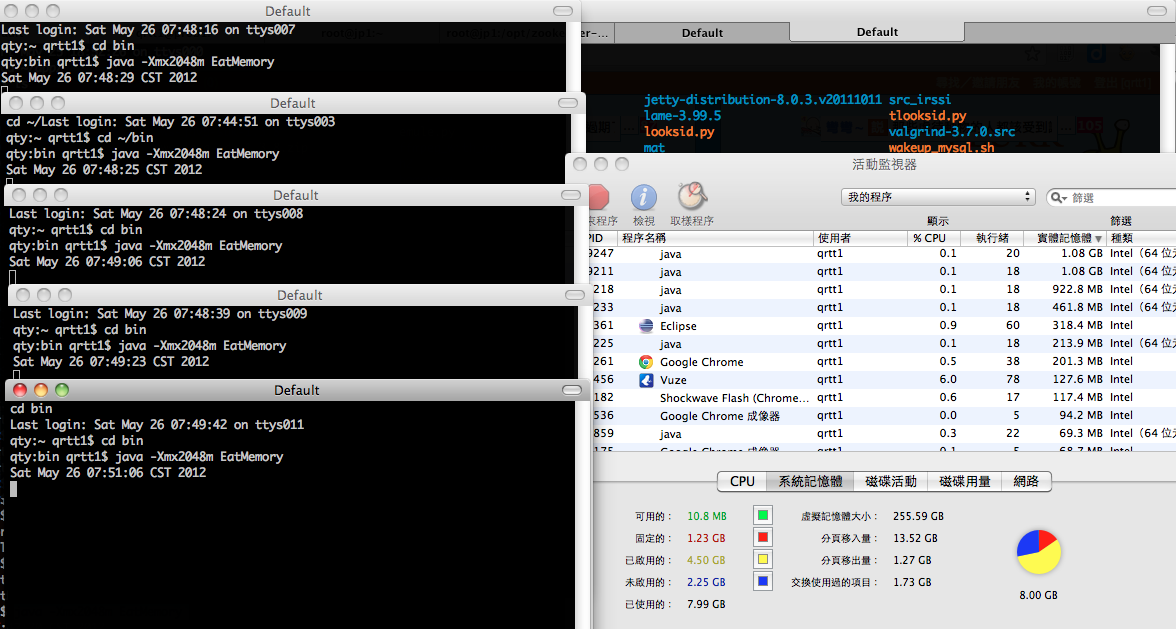
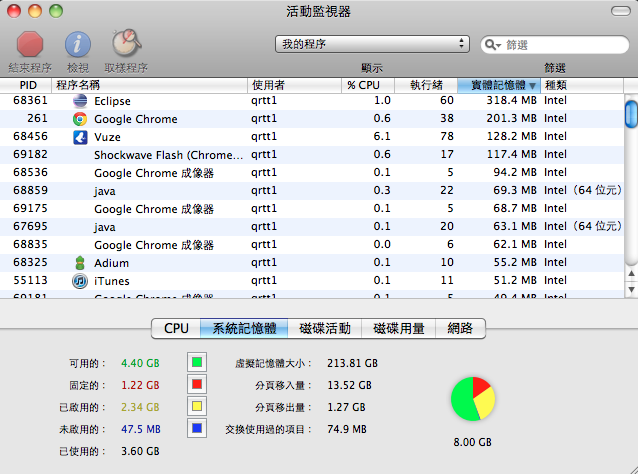
有時在  osx 上開開關關程式後會發現記憶體都變成『未啟用』的狀態。而『可用的』記憶體維持在相當少的數量:


依網路上的說法這是 osx 要最佳程式啟動的機制。當你曾開過一個程式,關閉後,他會被放入『未啟用的』這個區域。若你再打開能直接以記憶體內的『快取』啟動程式。可參考官方網頁的說明:

未啟用的:
這些資訊目前已經在 RAM 中,不過目前並未使用,只是最近曾經使用過。
舉例來說,如果長時間使用 Mail 後結束此程式,系統會將 Mail 用過的 RAM 標示為“未啟用的”記憶體。其他應用程式可以使用“未啟用的”記憶體,這一點和“可用的”記憶體相同。  不過如果其他應用程式尚未使用 Mail 的“未啟用的”記憶體,您就已經先開啟 Mail,這時 Mail 開啟的速度就會比較快,因為這部分“未啟用的”記憶體已經轉換成“已啟用的”記憶體,而不是從比較慢的磁碟機載入。

知道大概是怎麼一回事後,心理想:『那有工具來幫助我把那個快取的資料清掉嗎?』目前似乎沒有看到直接的工具,不過依據網路上的資料,普遍的看法都是當記憶體不夠用時會釋放『未啟用的』記憶體。這時就想起了平時被嫌棄記憶體用量大的 Java 程式,於是我寫了一個吃掉記體的程式:

..

這想法很單純,只是要把『未啟用』區的東西給擠出來:


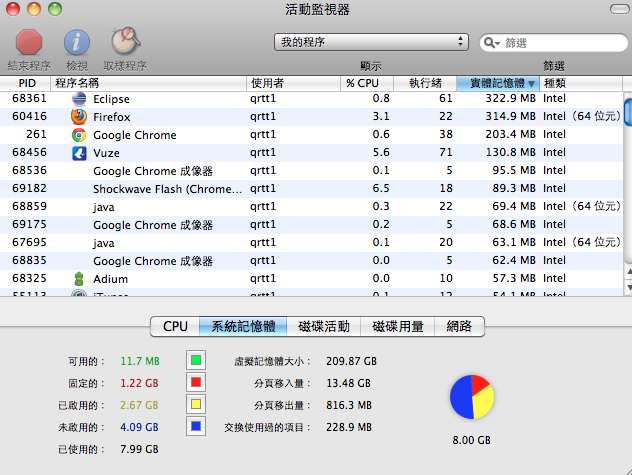
因為每一隻程式約佔用 1 GB 的記憶體,我開 4 隻恰好為『未啟用』的大小。然後把他們關掉。我們又再度擁有 4 GB 的可用記憶體:


2012年4月12日 星期四

MySQL 權限管理小技巧

由於過去的 MySQL 使用並沒太多的帳號規劃,只有個簡單的 user account,例如:myuser,配上 % any host 的認證組合。這個組合開的是最大的權限,雖然有在 iptables 下設定允許存取的 ip,但仍想針對特定的 ip 進行權限管理。在密碼是多數的人馬都知道的情況下,找到一個算是可用的方法。

因為 mysql 對於連線進來的 user account 會先替無萬用字元的組合配對(萬用字元的組合數較少者優先配對),我們可以針對某一個 ip 設同一個 user account 同一組密碼。並 grant 那一組特定的 ip 使用 USAGE 權限。如同手冊說的 USAGE 就是沒有權限。這樣即使拿到 user account 也無法做什麼,我們就可以強迫由特定 ip 上來的人用我們指定的 user account。而不是只能口頭相約,希望他使用我們替他額外準備好的帳號。

2012年3月24日 星期六

貼心的 libgmp

常在 $HOME 裡安裝一些自己需要的 library,剛好看到 libgmp 有個貼心的提醒:


..

..

2012年3月10日 星期六

[ffmpeg] 0.9 版後的新式 interrupt

這次試著更新專案內的 ffmpeg 至最新的 tag 版本 n0.9。發現專案內的『deprecated』比以往更多,但還都是能編譯的狀態。依慣例得確認一下在最新的 source code 裡,那些 deprecated 是真的被移除。於是編了 master branch 上的 code,發現 io interrupt callback 的寫法已經不再相容舊版了。

對於 ffmpeg 文件常跟不上 source code 的狀態,這連 changelog 也沒有記載這件事,我們可以簡單 diff n0.9 與前一版找出改變的部分,能利用一定會用到 io interrupt callback 的 ffmpeg.c 來作 diff:

..

舊式的 io interrupt callback 是一個 global function pointer:
..

新式的 io interrupt callback 使用一個 struct 包起來,設定在各別的 AVFormatContext:
..

要修改的部分雖然不太多,但 callback function 的參數有改,這是得注意的部分 :D

2012年3月7日 星期三

[osx] 發現 ARCHFLAGS 的妙用

試著用 easy_install 安裝 PIL 結果發生問題:

qrtt1$ sudo easy_install -U pil
Searching for pil
Reading http://pypi.python.org/simple/pil/
Reading http://www.pythonware.com/products/pil
Reading http://effbot.org/zone/pil-changes-115.htm
Reading http://effbot.org/downloads/#Imaging
Best match: PIL 1.1.7
Downloading http://effbot.org/media/downloads/PIL-1.1.7.tar.gz
Processing PIL-1.1.7.tar.gz
Running PIL-1.1.7/setup.py -q bdist_egg --dist-dir /var/folders/aQ/aQLNlFLOF28xewK2A7i0X++++TM/-Tmp-/easy_install-eVQU9j/PIL-1.1.7/egg-dist-tmp-L149wy
--- using frameworks at /System/Library/Frameworks
_imaging.c:3017: warning: initialization from incompatible pointer type
_imaging.c:3077: warning: initialization from incompatible pointer type
/usr/libexec/gcc/powerpc-apple-darwin10/4.2.1/as: assembler (/usr/bin/../libexec/as/ppc/as or /usr/bin/../local/libexec/as/ppc/as) for architecture ppc not installed
Installed assemblers are:
/usr/bin/../libexec/as/x86_64/as for architecture x86_64
/usr/bin/../libexec/as/i386/as for architecture i386
/usr/bin/../libexec/as/arm/as for architecture arm
_imaging.c:3017: warning: initialization from incompatible pointer type
_imaging.c:3077: warning: initialization from incompatible pointer type
_imaging.c:3281: fatal error: error writing to -: Broken pipe
compilation terminated.
_imaging.c:3017: warning: initialization from incompatible pointer type
_imaging.c:3077: warning: initialization from incompatible pointer type
lipo: can't open input file: /var/folders/aQ/aQLNlFLOF28xewK2A7i0X++++TM/-Tmp-//ccCj3S35.out (No such file or directory)
error: Setup script exited with error: command 'gcc-4.2' failed with exit status 1

看了一下 log 訊息,發現怎麼多了編譯 arm 版本的動作呢?在網上也找到有人分享了它的解法,重點在於如何讓 easy_install 只編譯我們真正需要用到的 x86_64 與 i386 版本。原來重點在於 ARCHFLAGS 的使用:

sudo ARCHFLAGS="-arch i386 -arch x86_64" easy_install -U pil
感謝 Installing python PIL in MAC OS, having xcode4 提供的解決之道 :D

2012年3月5日 星期一

[ffmpeg] 由 0.8.7 昇級至 0.9 的 linking error on osx

由於舊的 swscale 在轉換 yuv 至 rgb 時,在某些 format 會產生一條綠色的矩形在底部。這個情況已經透過由 AVFrame 內的 data 抓出來,用 swscale 之外的工具驗證過了。但單純地將 yuv 轉成 png 是沒有那個綠色的矩形的。在回報 bug 或是要試著自行修復前,當然得做一點『標準動作』:

  • 確認下一個 stable 版是否也有同樣的問題
  • 確認 repo 上最新的狀態是否也有同樣的問題
目前採用的是 ffmpeg 0.8.7 加上我們自己的 patch,由 git fetch 後,我們能看到還有 0.8.8, 0.8.9 再來就進入了 0.9 版。我選擇了 0.9 版作為我們預計要使用的 stable 版本,利用 cherry-pick 簡單地 patch 需要的檔案後,編譯一切正常。但進入 xcode 編譯 Application 時發生了問題:


Undefined symbols for architecture x86_64:
"_kVDADecoderConfiguration_Height", referenced from:
_ff_vda_create_decoder in libavcodec.a(vda.o)
"_kVDADecoderConfiguration_Width", referenced from:
_ff_vda_create_decoder in libavcodec.a(vda.o)
"_kVDADecoderConfiguration_SourceFormat", referenced from:
_ff_vda_create_decoder in libavcodec.a(vda.o)
"_kVDADecoderConfiguration_avcCData", referenced from:
_ff_vda_create_decoder in libavcodec.a(vda.o)
"_kCVPixelBufferPixelFormatTypeKey", referenced from:
_ff_vda_create_decoder in libavcodec.a(vda.o)
"_kCVPixelBufferIOSurfacePropertiesKey", referenced from:
_ff_vda_create_decoder in libavcodec.a(vda.o)
"_VDADecoderCreate", referenced from:
_ff_vda_create_decoder in libavcodec.a(vda.o)
"_VDADecoderDecode", referenced from:
_ff_vda_decoder_decode in libavcodec.a(vda.o)
"_CVPixelBufferRelease", referenced from:
_ff_vda_release_vda_frame in libavcodec.a(vda.o)
_ff_vda_destroy_decoder in libavcodec.a(vda.o)
"_VDADecoderDestroy", referenced from:
_ff_vda_destroy_decoder in libavcodec.a(vda.o)
"_CVPixelBufferGetPixelFormatType", referenced from:
_vda_decoder_callback in libavcodec.a(vda.o)
"_CVPixelBufferRetain", referenced from:
_vda_decoder_callback in libavcodec.a(vda.o)
ld: symbol(s) not found for architecture x86_64
clang: error: linker command failed with exit code 1 (use -v to see invocation)

有某些 symbol 找不到。查了一下 changelog,原來 0.9 版還多了 vda 的加速技能。既然在 ffmpeg 編譯時沒有問題,那應該就是 xcode 的設定需要改變,透過這些 symbol 名稱,找出了我們缺少了二個 framework:
加上這二個 framework 後,我們就能編譯正常並且使用具有 VDA 加速效果的 ffmpeg。

2012年3月4日 星期日

[autotools] 加入額外的 m4 路徑

要試著在 osx 上編譯 irssi,由於我並不是用 macports 安裝 library 的,有些 .m4 檔並不是裝預設的目錄。以 homebrew 來說,它會放在 homebrew 安裝目錄的 share/aclocal。為了要讓 irssi 提供的 autogen.sh 吃到我指定的 .m4 路徑,需要更動 ACLOCAL 變數:

ACLOCAL="aclocal -I. -I$HOME/app/homebrew/share/aclocal" ./autogen.sh

除此之外,再解決一些相依性的問題,我就能編譯自己的 irssi 了 :D